D.I.Y: Off-road preparation
Fettling a dirt bike ready for off-road fun isn't hard, but requires a dash of specialist knowledge. So here it is


Trail riding is becoming an ever more popular pastime. Some of the best two-wheeled experiences can be had off-road, and there are likely to be plenty of decent trails on your doorstep. But there are one or two important points to remember. On the road, fuel stations are easy to find. Despite most sportsbikes still struggling to cover more than 120 miles on a tank a trail bike will manage far less before it gets thirsty for gas, so always plan your route carefully.
Secondly, the AA or RAC won't want to take a van off-road to come to your rescue if you suffer a breakdown, so preparation is key.
Checking the oil, water and fluids, making sure everything is done up properly and nothing is hanging off the bike is all basic stuff, but it's even more important to make sure everything is in good order before you hit the trail.
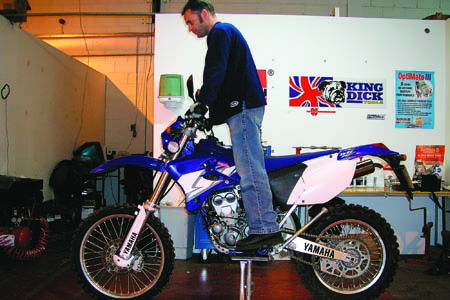
The majority of your time off-road will be spent standing on the footrests, so it's important to set the position of the handlebars, levers and foot controls. If the bike has been set for the road the chances are the handlebars will be too far back and the clutch and front brake levers will be too high.
To get everything in the right place, put the bike on a stand or get someone to hold it upright for you, then climb on and assume a standing position. Start with the bars. Slacken the pinch bolts enough to allow movement of the bars, but not so much they flop forward or back on their own. Get back on the bike and move the bars until they feel most comfortable while standing. Nip up the pinch bolts evenly, then torque them down to the recommended setting, always starting with the two front bolts.
Move on to the levers. Again, slacken the pinch bolts on their clamps enough to move the levers up or down. If your bike has brush guards fitted, loosen their pinch bolts at the same time. Stand up on the bike and adjust both the brake and clutch levers until they are in a comfortable position. When trail riding you will almost always have at least two fingers on the clutch, so make sure you can place two fingers comfortably on the lever at all times while standing. Once you are happy adjust the brush guards and tighten all the pinch bolts. Unlike the handlebars, which should never move, the levers and brush guards should move if enough force is used. Falling off a trail bike is inevitable, and if the pinch bolts holding the brush guards and levers are too tight the levers and guards are likely to break when they hit the ground. To test they are tightened correctly, nip the pinch bolts up and give the whole assembly a firm smack from below with your hand. The lever and brush guard should move, and be pulled back into position with a sharp tug.
Check the grips. The last thing you need is for one of these to come loose, but because they are constantly dunked in muddy puddles it can happen. To help keep them in place lock-wire tightly at three points along the grip. Make sure the wires' ends are at the rear of the grip so their sharp points don't pierce the palm of your hand.
Gear lever position is equally important. There will be plenty of times you will need to stamp down through the box or hook another gear to avoid an obstacle. Motocross boots are chunkier than the average trainer, so the best way to determine the lever position is to put your boots on and stand on the bike. If the bike has been set-up for the road the lever is likely to be too low to get a motocross boot underneath. Undo and remove the pinch bolt holding the lever on, slide the lever off the shaft and move it up to where you think the lever will be most comfortable. Get back on the bike to make sure it feels spot-on before refitting the pinch bolt and tightening it.
Most modern trail bikes have an air bleed screw at the top of the forks. Long travel off-road forks can draw air in past their seals as fully-compressed sliders rebound, and this builds pressure inside the fork. It's important to periodically remove the screw to release the air, or the seals may blow.
Another cause of blown seals are the particles that make their way past the dust cover and into the fork seal. Using a small flat blade screwdriver gently lift the dust cover. Clean underneath the seal making sure it is free from any dust and dirt and refit the seal by pressing it gently into place.
Unlike the paper air filter elements used by most road bikes, the majority of off-road machines will have a foam air filter fitted. Almost all of these are washable, so replacement is rarely necessary. Regular washing and re-oiling is essential though, and must be done after every muddy or dusty ride to maintain performance and to stop the engine sucking in tiny particles of dirt.
To clean the filter, remove it from the bike (usually easy to do after removing a sidepanel or the seat) and wash it with a filter cleaner as per the cleaner's instructions. Re-oil the filter, using a specific foam filter oil.
Lubing the chain is important on any bike, but avoid using heavy, sticky lube on a trail bike. The best way to treat a trail bike chain is to clean it thoroughly with a solvent based de-greaser then coat the entire chain with a light penetrating lube such as WD-40. Use the same lube to coat every electrical connecter block, which will help waterproof the electrical system.
Most bikes will have breather tubes with bungs fitted. These fill with water, oil or fuel and need periodical draining. Release the bung to let the fluid out.
One last tip - make sure the rear wheel spindle nut is on the right-hand side of the swingarm. This will prevent it being worked loose while riding through deep ruts.
You can't predict every eventuality, but at least try to cover the obvious stuff. Always carry a basic tool kit consisting of essential tools for removing wheels, bodywork and any parts likely to become damaged such as handlebars and levers. A spark plug and spare brake and clutch levers make useful additions to the toolkit. If, after all your meticulous preparation, you still break down, make sure you're carrying a decent tie-down to use as a tow rope - attach your bike to your mate's bike footrest-to-footrest.
8 steps to off-road readiness
1 Release the pinch bolts and set the bars so they're in a comfortable position when standing up. Re-tighten by nipping the bolts up, then torquing to the correct setting
2 Ditto the brake and clutch levers, and brush guards, if fitted. Don't over-tighten though - the levers and guards should move, not break off, in the event of a spill
3 Set the gear lever so you can fit a motocross boot underneath when stood on the pegs. Make sure the pinch bolt is secure - if it's loose the lever could knacker the shaft's splines
4 Lockwire the grips in place, ideally using proper lockwire pliers. Make sure the ends of the wire aren't positioned where they can dig into your fingers or palm
5 Clean the air filter, using foam filter cleaner, then re-oil with spray-on foam filter oil. It's not necessary to match filter oil and latex glove colours, but it does look nicer in pictures
6 Using a screwdriver, prise the fork seal dust covers clear and clean all around and underneath them. Make sure everything is free of dirt and grit before refitting
7 Periodically undo the air bleed screw on the top of the forks to release the build-up of air pressure inside. If you don't the pressure can blow the fork seals
8 Spray water-dispersing penetrating oil or silicone spray onto the electrical connectors so you stand half a chance of getting the bike going again after submerging it in a river

Some of the best two-wheeled experiences can be had off-road, and there are likely to be plenty of decent trails on your doorstep. But there are one or two important points to remember. On the road, fuel stations are easy to find. Despite most sportsbikes still struggling to cover more than 120 miles on a tank a trail bike will manage far less before it gets thirsty for gas, so always plan your route carefully. Secondly, the AA or RAC won't want to take a van off-road to come to your rescue if you suffer a breakdown, so preparation is key.
Checking the oil, water and fluids, making sure everything is done up properly and nothing is hanging off the bike is all basic stuff, but it's even more important to make sure everything is in good order before you hit the trail.
The majority of your time off-road will be spent standing on the footrests, so it's important to set the position of the handlebars, levers and foot controls. If the bike has been set for the road the chances are the handlebars will be too far back and the clutch and front brake levers will be too high.
To get everything in the right place, put the bike on a stand or get someone to hold it upright for you, then climb on and assume a standing position. Start with the bars. Slacken the pinch bolts enough to allow movement of the bars, but not so much they flop forward or back on their own. Get back on the bike and move the bars until they feel most comfortable while standing. Nip up the pinch bolts evenly, then torque them down to the recommended setting, always starting with the two front bolts.
Move on to the levers. Again, slacken the pinch bolts on their clamps enough to move the levers up or down. If your bike has brush guards fitted, loosen their pinch bolts at the same time. Stand up on the bike and adjust both the brake and clutch levers until they are in a comfortable position. When trail riding you will almost always have at least two fingers on the clutch, so make sure you can place two fingers
comfortably on the lever at all times while standing. Once you are happy adjust the brush guards and tighten all the pinch bolts. Unlike the handlebars, which should never move, the levers and brush guards should move if enough force is used. Falling off a trail bike is inevitable, and if the pinch bolts holding the brush guards and levers are too tight the levers and guards are likely to break when they hit the ground. To test they are tightened correctly, nip the pinch bolts up and give the whole assembly a firm smack from below with your hand. The lever and brush guard should move, and be pulled back into position with a sharp tug.
Check the grips. The last thing you need is for one of these to come loose, but because they are constantly dunked in muddy puddles it can happen. To help keep them in place lock-wire tightly at three points along the grip. Make sure the wires' ends are at the rear of the grip so their sharp points don't pierce the palm of your hand.
Gear lever position is equally important. There will be plenty of times you will need to stamp down through the box or hook another gear to avoid an obstacle. Motocross boots are chunkier than the average trainer, so the best way to determine the lever position is to put your boots on and stand on the bike. If the bike has been set-up for the road the lever is likely to be too low to get a motocross boot underneath. Undo and remove the pinch bolt holding the lever on, slide the lever off the shaft and move it up to where you think the lever will be most comfortable. Get back on the bike to make sure it feels spot-on before refitting the pinch bolt and tightening it.
Most modern trail bikes have an air bleed screw at the top of the forks. Long travel off-road forks can draw air in past their seals as fully-compressed sliders rebound, and this builds pressure inside the fork. It's important to periodically remove the screw to release the air, or the seals may blow.
Another cause of blown seals are the particles that make their way past the dust cover and into the fork seal. Using a small flat blade screwdriver gently lift the dust cover. Clean underneath the seal making sure it is free from any dust and dirt and refit the seal by pressing it gently into place.
Unlike the paper air filter elements used by most road bikes, the majority of off-road machines will have a foam air filter fitted. Almost all of these are washable, so replacement is rarely necessary. Regular washing and re-oiling is essential though, and must be done after every muddy or dusty ride to maintain performance and to stop the engine sucking in tiny particles of dirt.
To clean the filter, remove it from the bike (usually easy to do after removing a sidepanel or the seat) and wash it with a filter cleaner as per the cleaner's instructions. Re-oil the filter, using a specific foam filter oil.
Lubing the chain is important on any bike, but avoid using heavy, sticky lube on a trail bike. The best way to treat a trail bike chain is to clean it thoroughly with a solvent based de-greaser then coat the entire chain with a light penetrating lube such as WD-40. Use the same lube to coat every electrical connecter block, which will help waterproof the electrical system.
Most bikes will have breather tubes with bungs fitted. These fill with water, oil or fuel and need periodical draining. Release the bung to let the fluid out.
One last tip - make sure the rear wheel spindle nut is on the right-hand side of the swingarm. This will prevent it being worked loose while riding through deep ruts.
You can't predict every eventuality, but at least try to cover the obvious stuff. Always carry a basic tool kit consisting of essential tools for removing wheels, bodywork and any parts likely to become damaged such as handlebars and levers. A spark plug and spare brake and clutch levers make useful additions to the toolkit. If, after all your meticulous preparation, you still break down, make sure you're carrying a decent tie-down to use as a tow rope - attach your bike to your mate's bike footrest-to-footrest.
Sponsored By

Britain's No.1 Specialist Tools and Machinery Superstores
When it comes to buying tools and machinery, you need to know you're buying from specialists who know what they're talking about.
Machine Mart eat, sleep and breathe tools and machinery, and are constantly updating their range to give you the very best choice and value for money - all backed by expert advice from their friendly and knowledgeable staff. With superstores nationwide, a dedicated mail order department and a 24 hour website offering quality branded items at fiercely competitive prices, they should be your first choice for quality tools and equipment.

